
✅ We last checked all the steps in this guide on iPhone 8 with 17.2.1 installed. The latest iOS version is 17.2.1.
AirDrop is a neat accessory that you can use for your Apple devices. Sharing and moving files with relative ease can save you a lot of time. Besides, you might have created data backup on your Macbook, but the data was wiped on your smartphone, and you want to restore it.
If you have an iPhone 8 and are struggling to get AirDrop to work, the information in this article should come in handy. Continue reading it and find out how to turn on AirDrop on iPhone 8.
Before we start, it is important to note a couple of things. First of all, AirDrop will work better with both Wi-Fi and Bluetooth enabled. Therefore, make sure that the connection is working properly. If you are uncertain, test it with different devices.
AirDrop-supported devices, which, in this case, is an iPhone 8, should be close enough to the network to transfer files, and they need to be close all the time. Disrupting the connection even for a moment may require you to start again.
Finally, not all files are supported by AirDrop, so do not be surprised if the process is halted because of certain file types. Also, as you can expect, if you are transferring large files, it may take a long time to get them from one device to another, particularly if you have a poor connection.
Part #1 – Enabling AirDrop on Your iPhone 8
You will have to enable the AirDrop on both iPhone and Macbook to transfer files back and forth between the two devices. Let’s start with the smartphone.
Access the control center by swiping up from the bottom of the home screen and make sure that both Wi-Fi and Bluetooth are enabled.
You will see multiple icons in the Control Center. However, the one for AirDrop is not visible. You need to tap your finger on the Airplane Mode shortcut and hold it for the AirDrop to appear (the image below shows you how it should look.
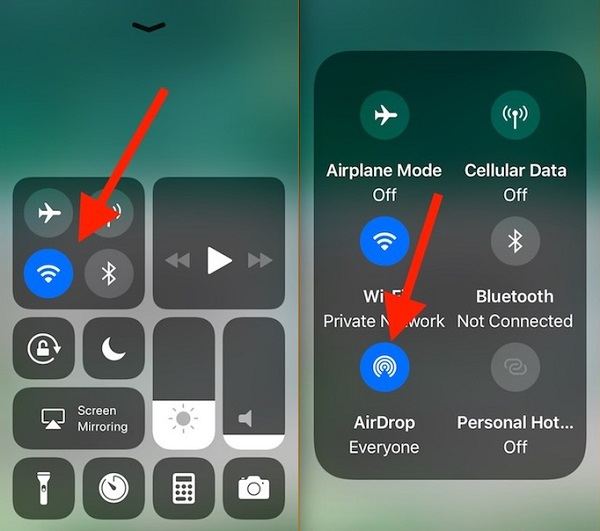
Click on the AirDrop icon and let other devices access the iPhone 8. There should be the word “Everyone” below the AirDrop, just like on the right side of the image above.
If you want to send files from the iPhone, locate them and click the Share button after selecting the files. There will be a separate AirDrop section that will allow you to send data to other AirDrop-supported devices.
Part #2 – Enabling AirDrop on Your Macbook
Enabling the feature on a Macbook is pretty straightforward. Go to Finder, then Go, and launch AirDrop. Turn on both Wi-Fi and Bluetooth just like on the smartphone. Select “Contacts Only” or “Everyone” to determine which devices can access your Macbook to share files via AirDrop.
To transfer files from a Macbook to another device, you can drag files and place them directly on the AirDrop profile you want to receive the files. Or select the files, click the Share button, and pick one of the recipients. The example photo below shows how the interface of AirDrop on a Macbook should look.

Pretty simple, right? And even if you do not want to use AirDrop, there are other ways to send and receive files on iOS. Emails, various communication platforms like Discord, social media sites, and applications you can find on the official app store.
Fixing AirDrop Issues on iPhone 8
If you are struggling to run AirDrop on your iPhone 8 despite the fact that both Wi-Fi and Bluetooth are functioning properly, try other solutions.
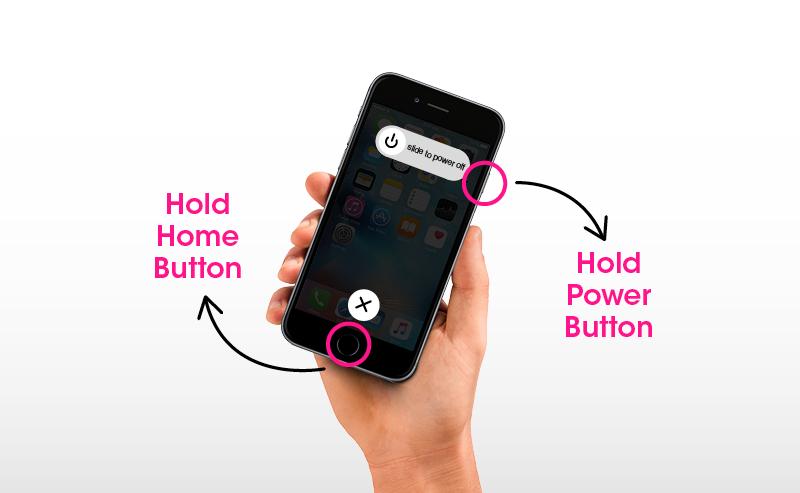
A soft smartphone reboot may solve the problem. Hold down the Power/Side button and either of the volume buttons and wait for a slider to power off the smartphone to appear. Turn off your iPhone and wait roughly 30 seconds. Then, press the Power button for a couple of seconds. Release the button when you see the Apple logo on the smartphone’s screen.
Another option worth considering is logging in and out of your iCloud account. Tap the iCloud tab in the iPhone settings and sign out. Restart the smartphone and sign into the iCloud account again.
Finally, you could try reconnecting to the network. Reset the network settings and sign in again by entering login details.